Iron-on transfers provide an excellent way to personalize your t-shirts and express your creativity. Whether you want to showcase your favorite designs, logos, or slogans, learning how to create iron-on transfers allows you to bring your ideas to life. In this article, we will guide you through the process of making iron-on transfers for t-shirts, enabling you to add a personal touch to your wardrobe effortlessly.
Materials Needed:
- T-shirt
- Iron-on transfer paper
- Inkjet printer
- Design software or online design tools
- Scissors
- Iron
- Hard surface (e.g., an ironing board)
- Parchment paper or a thin cotton cloth
Choose or create a design
Start by deciding on the design you want to transfer to the t-shirt. You can use graphic design software like Adobe Photoshop or Canva to create your own designs, or you can find pre-made designs online. Make sure the design you choose is suitable for iron-on transfers and reflects your desired results.
reverse design
Once the design is complete, it is very important to reverse it before printing. This step is important because the image needs to be mirrored in order to transfer properly to the fabric. Use the Flip or Mirror function in your design software or print options to flip the image horizontally.
print design
Place the iron-on transfer paper in the inkjet printer, making sure the print side is facing the correct direction (refer to the paper instructions). Adjust the printer settings according to the manufacturer's recommendations for the specific transfer paper you are using. Choose premium print settings for vibrant colors and sharp details.
trim design
Carefully trim the edges of the printed design with scissors. Leave a small frame around the design, but try to crop the image closer together to minimize excess transfer paper being visible on the t-shirt.
prepare t-shirt
Lay the t-shirt on a clean, flat surface to make sure there are no wrinkles. It is recommended to wash and dry the t-shirt before ironing the transfer to remove any size or residue that may hinder the transfer process.
Design positioning
Place the trimmed iron-on transfer on the desired area of the t-shirt, print side down. Make sure it's properly centered and aligned. You can temporarily secure transfers with pins or tape to keep them from moving during ironing.
heating
Set the iron to the proper temperature for ironing the transfer wrap. Generally, it should be set to pure cotton or high temperature molding. Preheat the iron for a few minutes to make sure it reaches the desired temperature.

Ironing Transfers
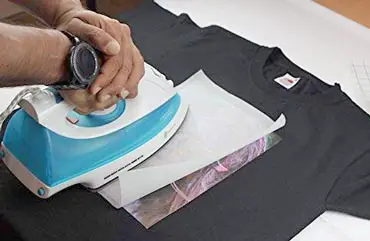
Place a piece of parchment or tissue paper over the iron-on transfer. The protective layer helps prevent direct contact between the iron and the transfer, avoiding any potential damage. Press the hot iron firmly onto the transfer paper, applying steady pressure for about 15-20 seconds. Make sure to cover the entire design area, applying pressure evenly.
Cool and remove backing
Allow the transfer material to cool completely before attempting to remove the backing. After cooling, gently peel off the backing paper from one corner. If any part of the transfer sticks to the backing, put it back on and iron it again, applying pressure for a few seconds.
final steps
After removing the backing paper, let the t-shirt sit for a few minutes to ensure proper adhesion of the transfer material. Avoid touching or stretching while the design is hot. Once completely cooled, your iron-on transfers can be worn and displayed.
Additional Tips:
- Test on a Scrap Fabric: Before applying the iron-on transfer to your t-shirt, it's a good idea to test it on a scrap piece of fabric. This allows you to familiarize yourself with the process and make any necessary adjustments before transferring the design to your desired t-shirt.
- Follow Manufacturer's Instructions: Different iron-on transfer papers may have specific instructions and temperature settings. Always refer to the instructions provided by the manufacturer of the transfer paper you are using for the best results.
- Wash and Care Instructions: To ensure the longevity of your iron-on transfer, it is recommended to wash your t-shirt inside out in cold water and avoid using harsh detergents or bleach. Additionally, avoid ironing directly on the design; instead, iron the t-shirt inside out or place a cloth over the design while ironing.
Creating iron-on transfers for t-shirts opens up a world of possibilities for expressing your unique style and personalizing your wardrobe. By following these step-by-step instructions, you can easily transform your favorite designs into wearable art. Get creative, have fun, and enjoy wearing your custom-made t-shirts with pride.


